For days I watched Rick and I could see the wheels just turning in his head while he stared at the livingroom ceiling. Little did I know he had a few surprises for me. I have to apologize I don't have many pics of his building process since it was to be a secret build....shhhh, I did sneak up a few times when he would slip out to the garage to cut something though hehe.
Sooooo, here is my new desk area he built into the nook that used to be a closet.
First, he anchored a frame to the wall
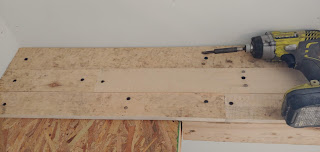
Cut out the desk top from OSB board
A few months ago he came home with some pallets from work and ripped those down. Well, he dipped into that stash to cover the OSB to make it look more like our floors (and future ceiling).
After he called me up to see what he had created and all the hugs and kisses were done...he smiled and handed over a tub of Elmer's Wood Filler Max so I could choose with "imperfections" I wanted covered.
I used a putty knife to cover any cracks and "extra" nail holes. On a side note here...the pic doesn't show that I chose not to cover the original nail heads in the pallet wood. When he ripped down the pallets, he sawed the nails off flush to the wood, keeping all the head intact. We both think leaving the nail heads give the slats more character.
While the wood filler was drying, I picked out a spot for him to drill a hole with a 1 1/4" paddle bit for me to slip any electric cords through and relieve the desk of "cord clutter"
Armed with an orbital sander and some 80 grit paper, I sanded the top and sides
This is my new smooth desk area...ready to stain
Trying to match the color of the floor was a migraine starter, so I decided to go with a stain closest to what the floors will be. (No, they haven't been finished...I want to touchup walls before we seal off those floors...and now I have two surprises to seal first, lol) Anyhow, I picked
Minwax Wood Finish in Golden Pecan.
With a small brush I swept on the first coat. I was excited to watch as just that first coat started to bring out the personality of the wood. And even more excited that it truly is a fast drying stain.
I should also mention, before staining this was washed down with a mixture of hot water, vinegar and Dawn dish soap and allowed to dry before I started.
After just one coat
After having the Old Man check out my staining skills, we decided one more coat would be a better fit for this room.
See how that second coat brought out even more character to the wood.
I will update this once it gets poly'd...but first I have paint to touch up on the walls before we seal in this room. Plus someone had one more trick up his sleeve for this room....a Beauty Bar....
The same concept as the desk, just not as long...so the leg was necessary on this one.
Hopefully soon I will get to show you all the DIY décor ideas I have for this Desk Area. Now my wheels are turning lol...and my to do list is getting longer. but who doesn't love another trip to the craft store for more "remodeling supplies."


No comments:
Post a Comment